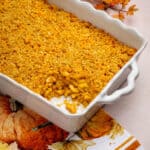
Baked Vegan Mac and Cheese
Your guests will never suspect that this creamy and super cheesy mac and cheese baked with a crispy breadcrumb topping is free of dairy! Serve it as a main or as a side. Either way, everyone will be back for seconds.
Servings: 12 servings
Calories: 476kcal
Ingredients
Mac and Cheese Base:
- ½ c. vegan butter or margarine (113 g), plus more for greasing (I use Earth Balance)
- ¼ c. + 2 Tbsp. 53 g all-purpose flour (53 g), or tapioca starch (48 g) (for gluten free, use tapioca starch)
- 3 ½ c. unsweetened, unflavored non-dairy milk, such as almond, cashew, or soy (830 ml)
- ¾ c. low-sodium vegetable broth (177 ml)
- ¼ c. nutritional yeast flakes (20 g)
- 1 vegetable bouillon cube or 1 tsp. bouillon substitute
- ½ tsp. paprika
- 2 c. shredded vegan cheddar cheese (240 g), plus more to taste (I like Follow Your Heart Shredded Cheddar)
- ¼ tsp. salt, plus more to taste
- ⅛ tsp. black pepper, plus more to taste
- 16 oz. elbow macaroni noodles (454 g), use the gluten free type, if needed
Topping:
- ¾ c. Panko breadcrumbs (68 g) (use the gluten free type, if needed)
- 3 Tbsp. nutritional yeast flakes (15 g)
- 1 tsp. onion powder
- ½ tsp. garlic powder
- ½ tsp. salt
- ¼ tsp. black pepper
- ¼ c. vegan butter or margarine, melted (56 g) (I use Earth Balance)
Instructions
- Melt the butter in a 3-quart or larger saucepan over medium-high heat. Add the flour (or starch) and whisk until all flour is incorporated.
- Add the non-dairy milk and broth and whisk until it becomes bubbly. Continue whisking as it boils until the mixture starts to thicken, about 5 minutes. Keep in mind, it will thicken quite a bit more after all the remaining ingredients are added.
- Remove the pan from the heat and add the nutritional yeast flakes, vegetable bouillon, and paprika. Once combined, whisk in the vegan cheese. Note: You may need to place the pan back over low heat for the cheese to completely melt. It may take several minutes of whisking to become smooth.
- Carefully taste and add more cheese for a cheesier flavor, and add salt and pepper to taste. Cover and set sauce aside for now.
- Preheat your oven to 350°F (approx. 177°C). Grease a 9-x-13-in. (23-x-33-cm) or other 3-quart baking dish with butter and set aside for now.
- Cook the elbow pasta in salted boiling water according to the package directions. Drain well and add the pasta to the pot containing the sauce. Stir well to coat all the macaroni noodles. Add salt to taste.
- Pour the mac and cheese into the prepared baking dish and smooth over the surface.
- In a small bowl, stir together the first six ingredients for the topping. Add the melted butter and stir again. Sprinkle this mixture evenly over the surface of the mac and cheese.
- Bake for 25–30 minutes, or until lightly golden brown around the edges. Let the mac and cheese rest at least 5 minutes before serving.
Notes
- Note: If sensitive to salt, use low-sodium vegetable bouillon cubes. You can always add more salt to taste afterward.
- For Best Gluten Free Version: Use the tapioca starch option instead of the regular all-purpose flour, and use gluten free elbow macaroni noodles. Use gluten free breadcrumbs (the panko type, if possible), for the topping.
- Make-Ahead Tip: Assemble the Mac and cheese base 1 day prior to serving by following steps 1 through 7. Let it cool for at least 15 minutes before covering with plastic wrap and placing in the fridge overnight. The next day, remove the dish from the refrigerator and allow it to warm to room temperature for 1 hour. Add the topping and bake according to steps 8 and 9.
- Dairy-free mac and cheese will keep well for up to 5 days in the refrigerator, and up to 3 months in the freezer. Let the dish cool completely before transferring to an airtight container, or cover with plastic wrap. If freezing, the dish should be prepared in an aluminum pan so it can go from freezer to oven safely... I also suggest wrapping the container in a layer of aluminum foil for extra protection.
Nutrition
Calories: 476kcal | Carbohydrates: 57g | Protein: 14g | Fat: 21g | Saturated Fat: 6g | Polyunsaturated Fat: 4g | Monounsaturated Fat: 5g | Trans Fat: 1g | Sodium: 867mg | Potassium: 304mg | Fiber: 6g | Sugar: 2g | Vitamin A: 572IU | Vitamin C: 1mg | Calcium: 149mg | Iron: 3mg